Self Service in NoahFace allows workers to:
Self Service requires an active network connection so it can provide up to date information.
Self Service is supported with the following HR Platforms:
It is also supported when using a custom integration with other HR platforms.
The exact functionality differs by HR platform, and is detailed in the sections below.
Self Service is available to all NoahFace customers with an Enterprise Plan
Self Service on an iPad requires version 25.21 or later of the NoahFace App.
Self Service functions can be accessed by pressing the My Schedule button at the bottom of the Clock In/Out screen:

Self Service on mobile phones requires version 26.3 or later of the NoahFace Go App.
Self Service functions can be accessed by pressing icons on the tab bar - currently only Schedule viewing is available:
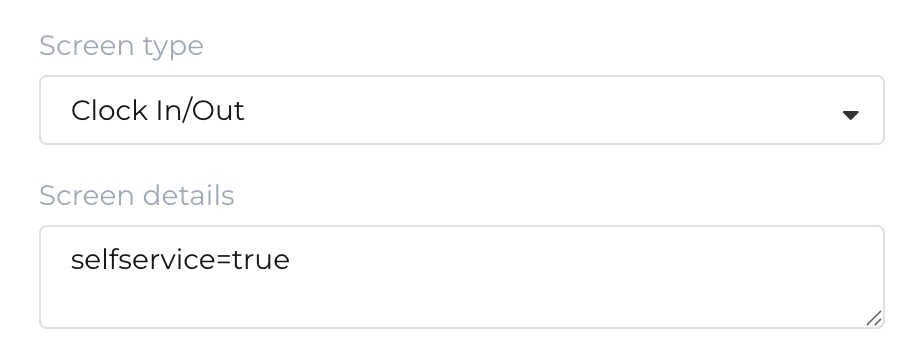
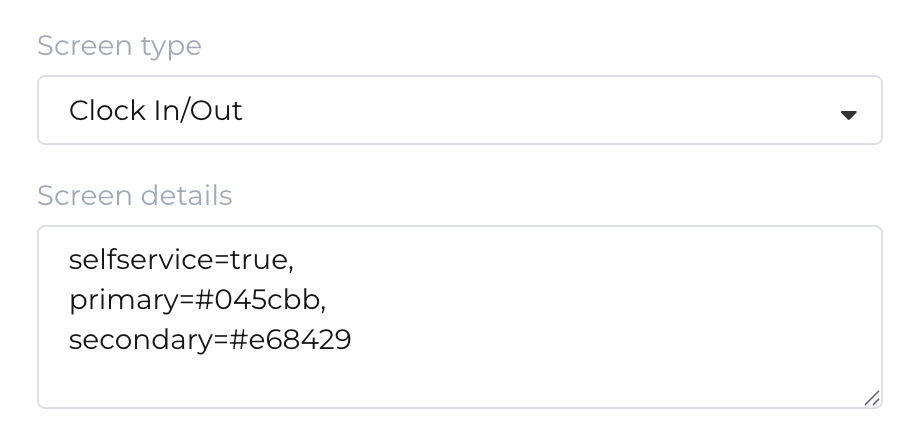
To enable Self Service, just set the "selfservice" configuration option to "true" in your Access Point Type Screen Details.
For example:
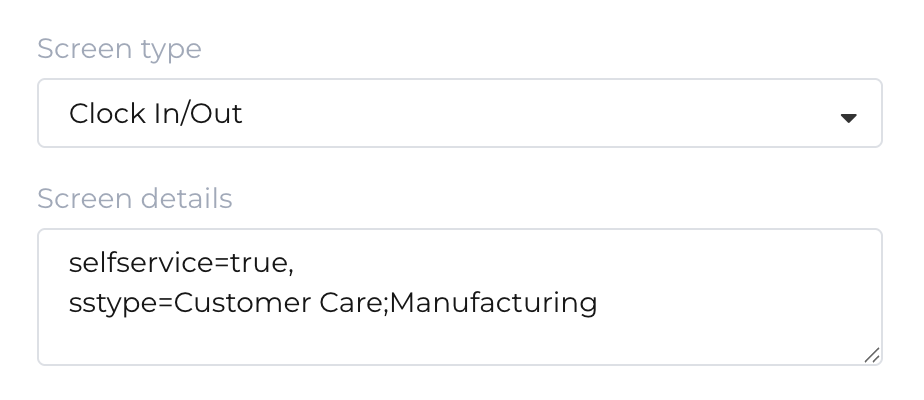
By default, Self Service is accessible by all users. You can restrict which users have access to Self Service by specifying any of the following configuration options in your Access Point Type Screen Details:
Lists of multiple User Types and Teams should be semi-colon separated and can optionally be specified using regular expressions.
For example:
By default, Self Service is accessible at all times. You can restrict the days and or hours users have access to Self Service by specifying any of the following configuration options in your Access Point Type Screen Details:
For example, to allow access between 10:30am and 2pm on Wednesday and Thursday only, you can specify:
ssday=3;4, ssfrom=10.5, ssto=14
or alternatively:
ssday=Wed;Thu, ssfrom=10.30, ssto=14:00
The Self Service button and screen in the NoahFace App is labelled "My Schedule" by default.
You can change the label on this button and the corresponding screen by setting the "selfservice" configuration option in your Access Point Type Screen Details.
You can also show/hide the icon on the button by setting the "ssicon" configuration option in your Access Point Type Screen Details to "true" or "false".
For example:

The Self Service screen has three tabs:
The labels on these tabs will automatically change to match the terminology used in your HR platform.
You can override these labels by specifying the "ssschedule", "ssleave", and "sstimesheet" configuration options in your Access Point Type Screen Details.
If you set any of these configuration options to "false" or "hide", the corresponding tab will be omitted.
The first tab is displayed by default, but you can change this by setting the "ssdefault" configuration option to any of the following (requires version 26.19 or later of the NoahFace App):
For example:

The Self Service pages in the NoahFace App will respond to the "primary" and "secondary" color configuration options in your Access Point Type Screen Details.
For example:
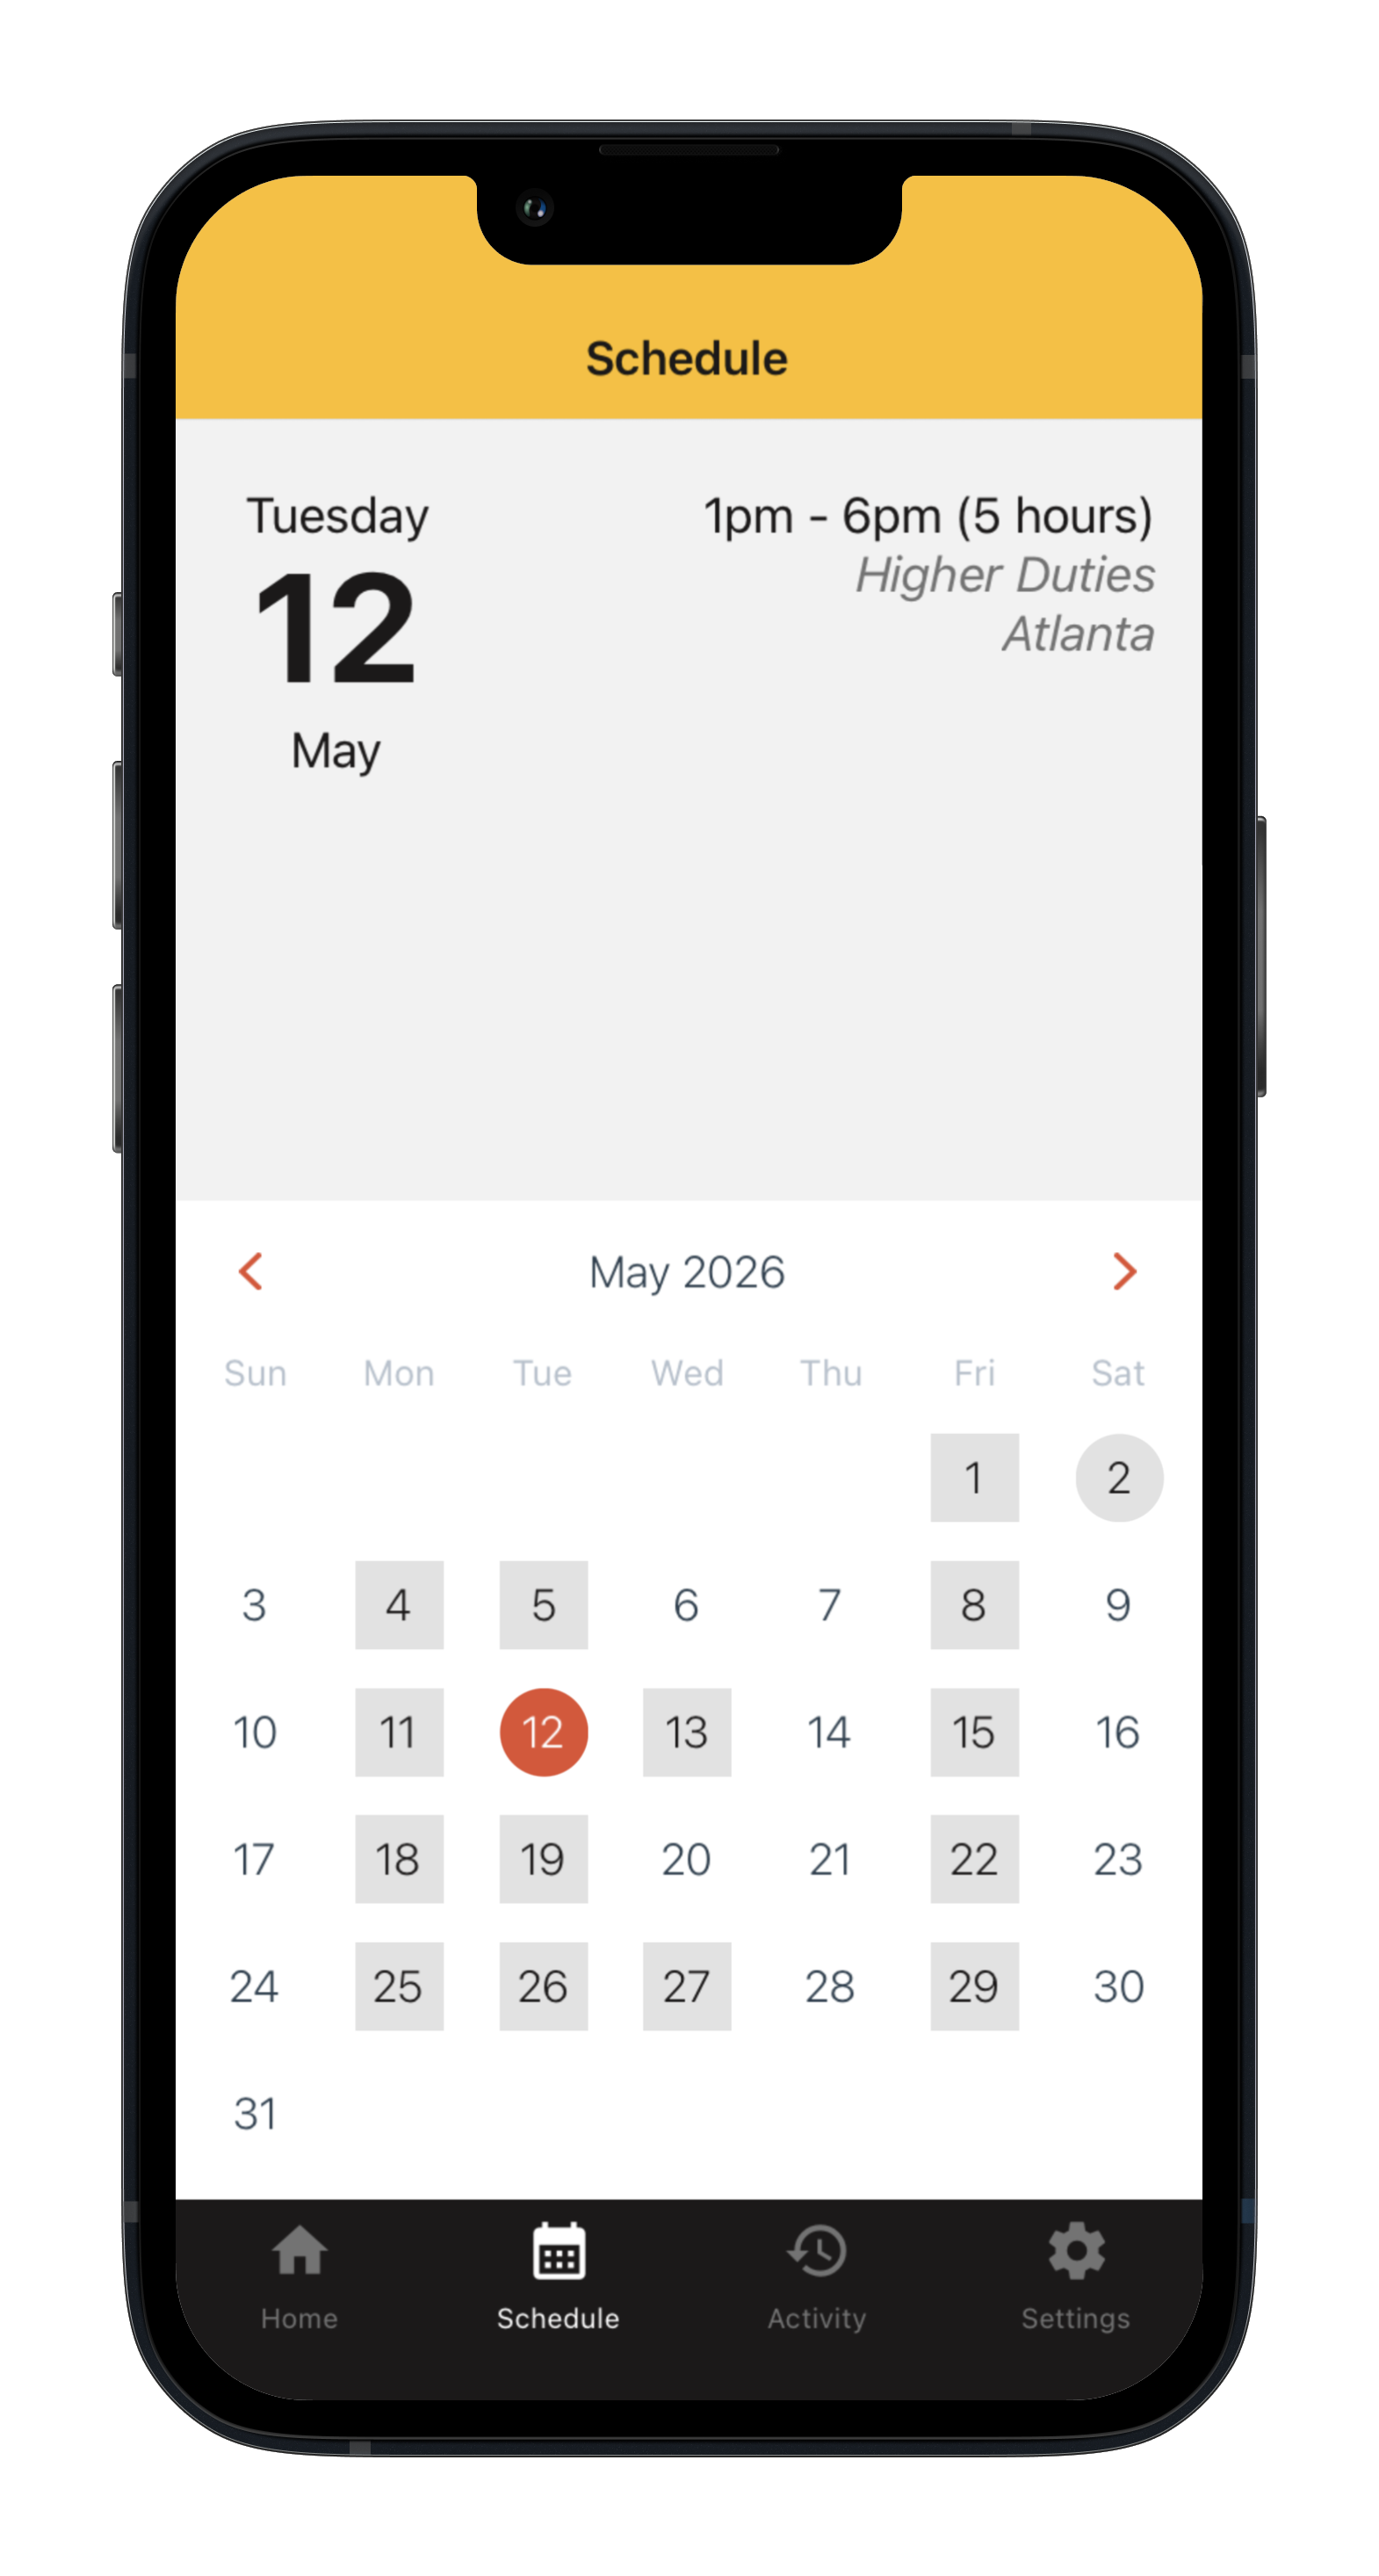
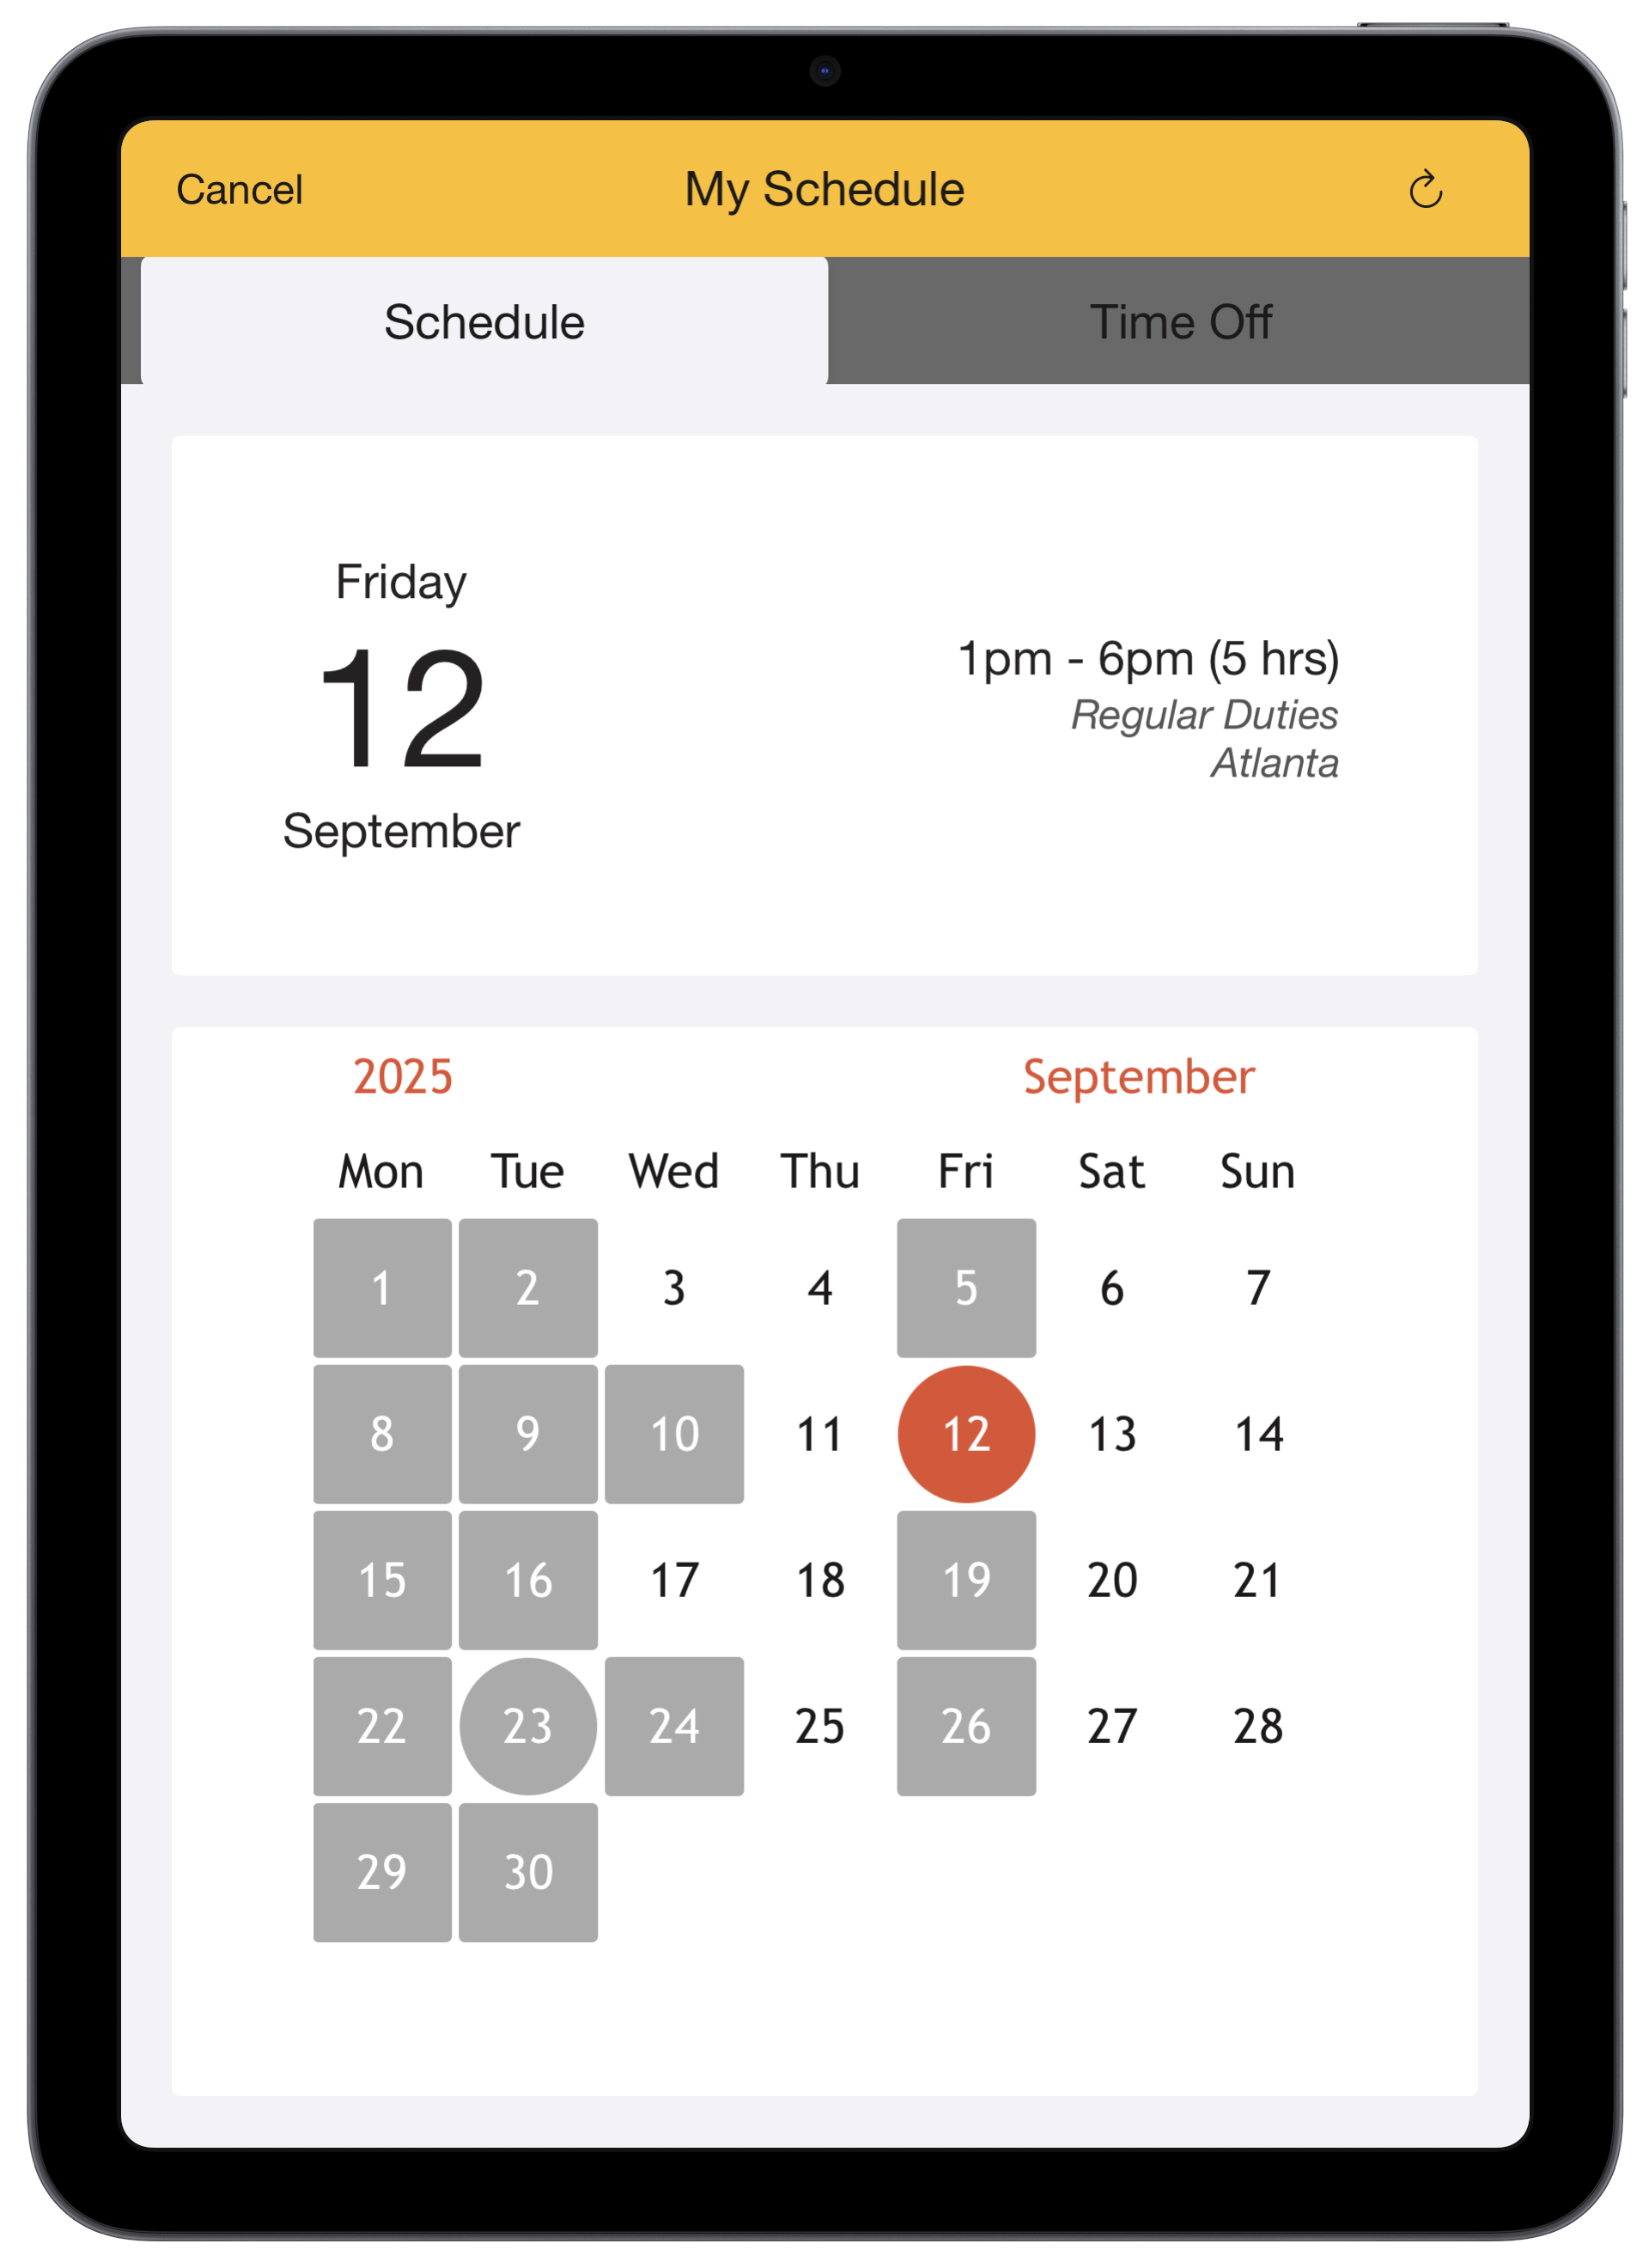
The Schedule screen allows workers to view their upcoming scheduled shifts.
The Schedule screen is available for all supported HR platforms except for SAP SuccessFactors.
It displays a calendar month at a time with days highlighted as follows:
The start and end times of shifts on the selected date are displayed, as well as additional details depending on your HR platform as follows:
You can swipe left or right on the calendar to view other months, or alternatively select a month by clicking on the current month name.
For example:
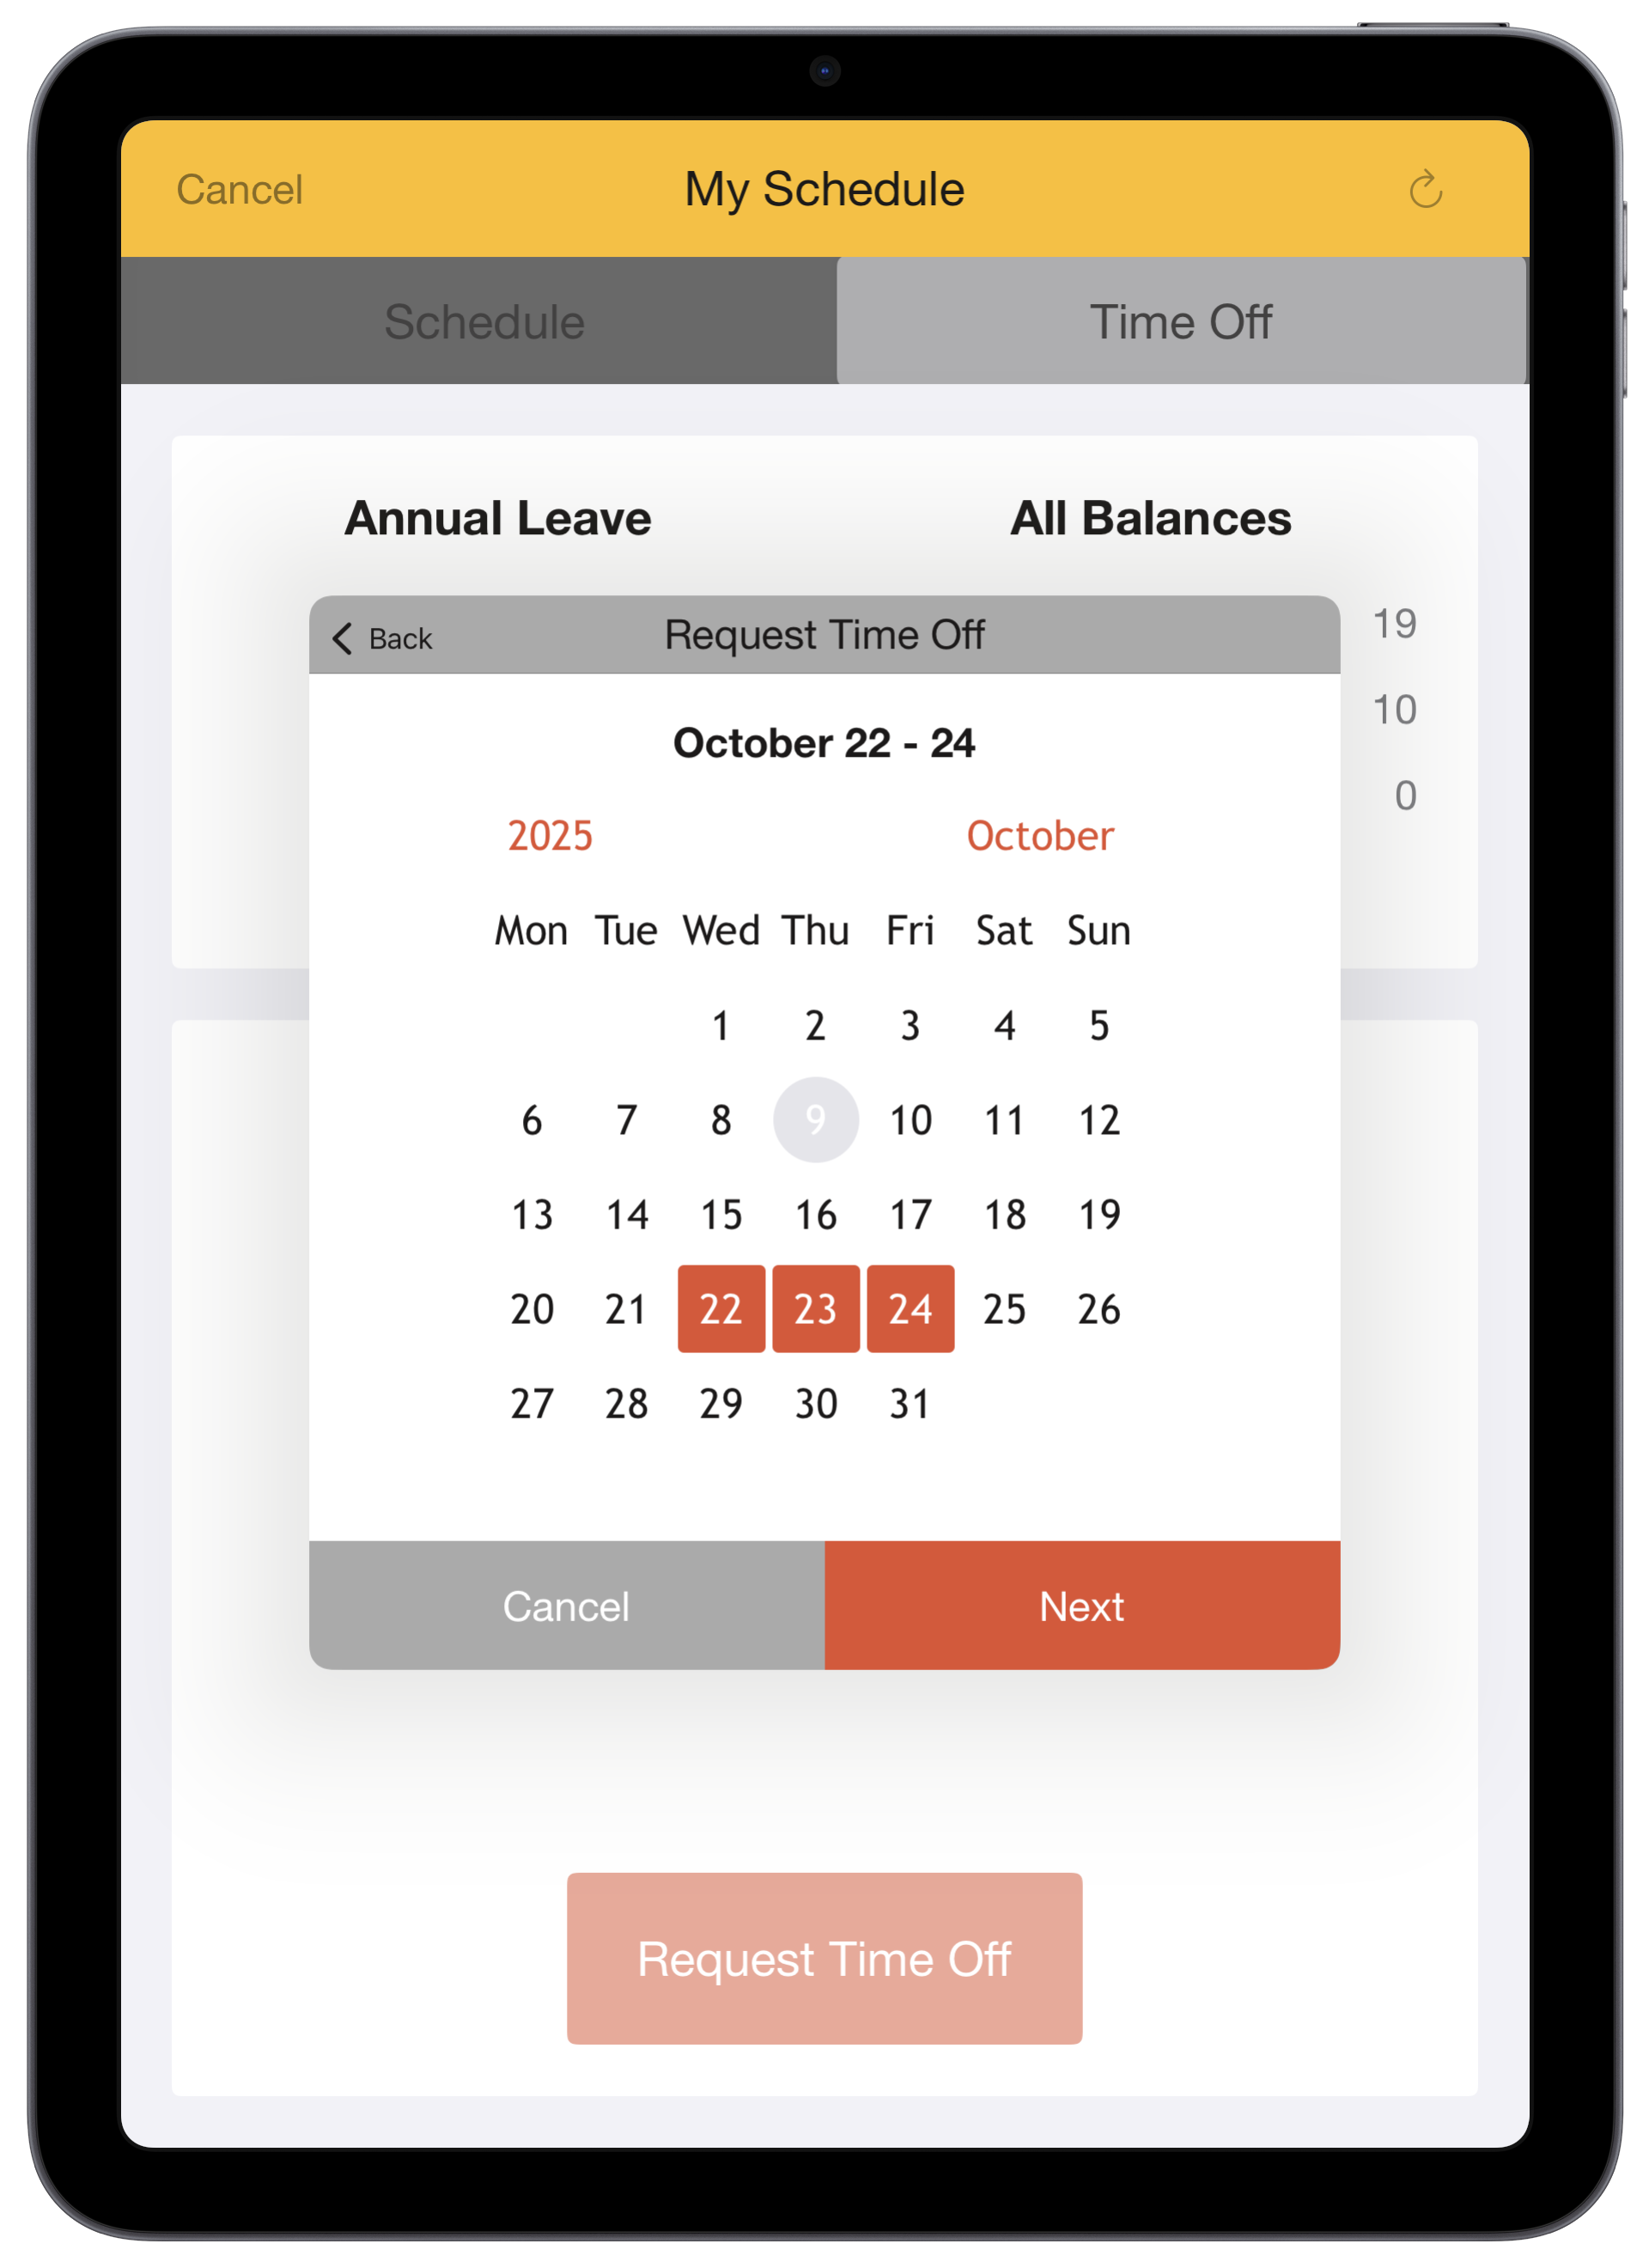
The Time Off screen allows workers to view their accumulated time off balances and request leave.
The Time Off screen is available for all supported HR platforms.
For example:

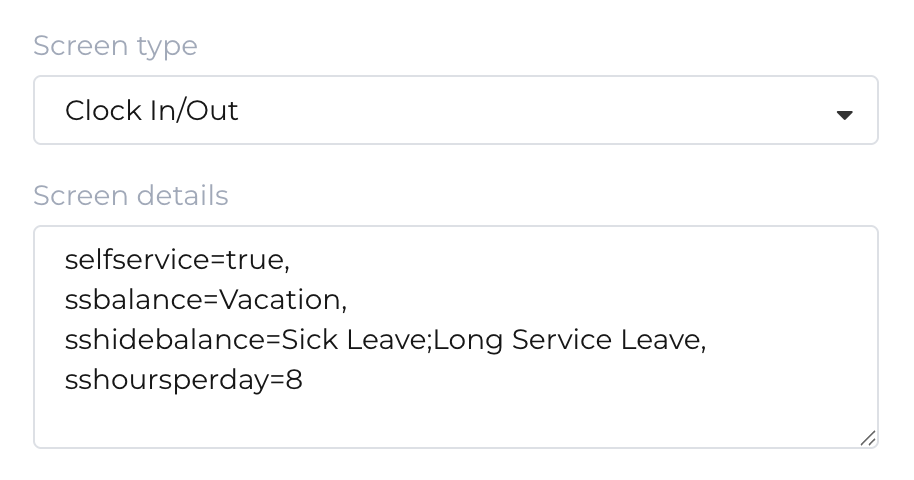
You can specify the primary balance to display by setting the "ssbalance" configuration option in your Access Point Type Screen Details.
You can specify that specific balances should be hidden by setting a semi-colon separated list as the "sshidebalance" configuration option in your Access Point Type Screen Details.
You can specify the number of hours per work day by setting the "sshoursperday" configuration option in your Access Point Type Screen Details.
You can specify that balances should include part days (eg: 25.5 instead of just 25) by setting the "sspartdays" configuration option in your Access Point Type Screen Details (this requires version 26.12 or later of the NoahFace App).
For example:
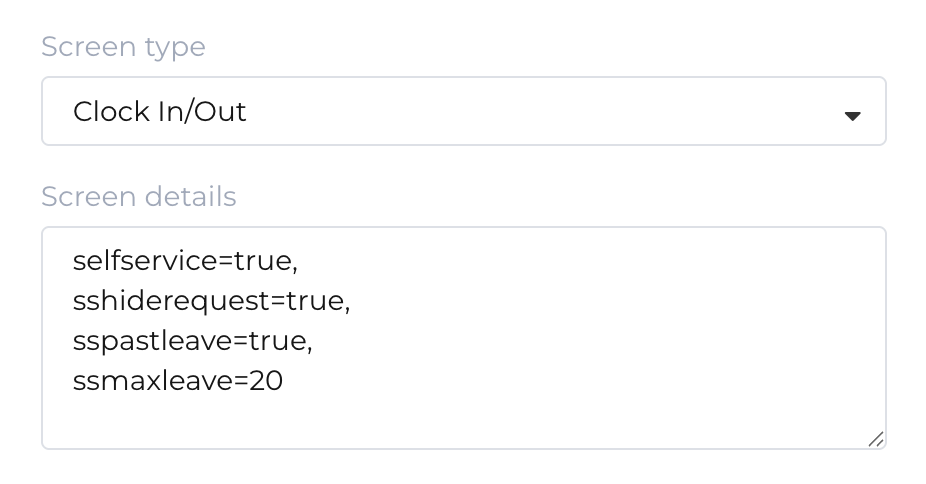
You can hide the requests screen by setting the "sshiderequest" configuration option in your Access Point Type Screen Details.
By default you can only request leave in the future. If you want to be able to request leave in the past you can set the "sspastleave" configuration option in your Access Point Type Screen Details.
You can specify the maximum duration of leave requests (in days) by setting the "ssmaxleave" configuration option in your Access Point Type Screen Details.
For example:
The Timesheet screen allows workers to view their timesheet and submit it for approval and payment.
The Timesheet screen is only available for Workday.
For example:

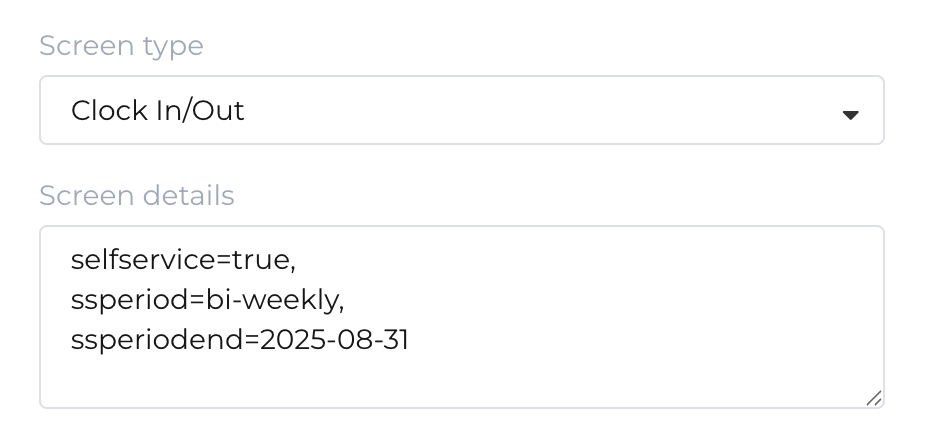
You can specify the timesheet period by setting the "ssperiod" configuration option in your Access Point Type Screen Details to one of the following:
You can specify the timesheet period end day by setting the "ssperiodend" configuration option in your Access Point Type Screen Details as one of the following (depending on your timesheet period):
You can specify the zoom factor for your timesheet acknowledgement by setting the "sssubmitzoom" configuration option in your Access Point Type Screen Details.
For example:
You can hide the option to submit timesheets by setting the "sshidesubmit" configuration option in your Access Point Type Screen Details.
You can specify whether workers can enter comments when submitting their timesheets by setting the "sscomments" configuration option in your Access Point Type Screen Details to either:
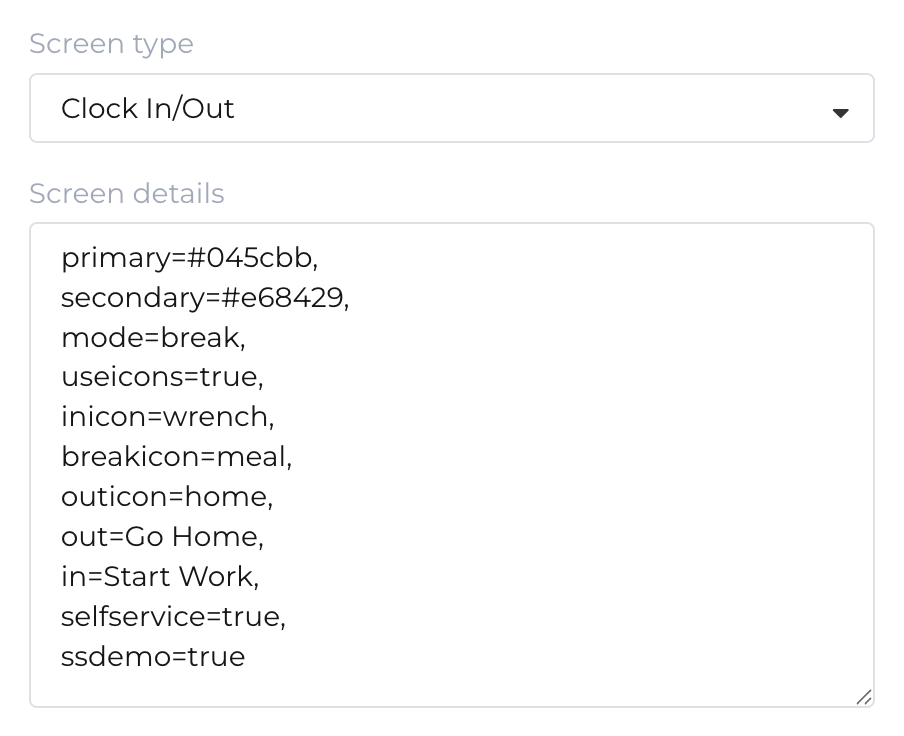
Self Service supports a demo mode that enables you to demonstrate the functionality without a connection to an HR platform.
You can enable demo mode by specifying the "ssdemo" configuration options in your Access Point Type Screen Details.
For example: